| Package | Version |
|---|---|
| aiohttp | 3.8.6 |
| aiohttp-tests | 3.8.6 |
| aiosignal | 1.3.1 |
| anyio | 4.1.0 |
| appdirs | 1.4.4 |
| asciitree | 0.3.3 |
| asgiref | 3.7.2 |
| astropy | 5.3.2 |
| asttokens | 2.4.1 |
| async-timeout | 4.0.3 |
| atomicwrites | 1.4.1 |
| attrs | 23.1.0 |
| autograd | 1.6.2 |
| autograd-tests | 1.6.2 |
| awkward-cpp | 26 |
| b2d | 0.7.4 |
| bcrypt | 4.0.1 |
| beautifulsoup4 | 4.12.2 |
| beautifulsoup4-tests | 4.12.2 |
| biopython | 1.81 |
| bitarray | 2.8.1 |
| bitarray-tests | 2.8.1 |
| bitstring | 4.1.1 |
| black | 24.4.0 |
| bleach | 6.0.0 |
| bokeh | 3.2.2 |
| boost-histogram | 1.3.2 |
| branca | 0.7.0 |
| brotli | 1.0.9 |
| cachetools | 5.3.1 |
| Cartopy | 0.21.1 |
| Cartopy-tests | 0.21.1 |
| cbor-diag | 1.0.1 |
| certifi | 2023.7.22 |
| cffi | 1.15.1 |
| cffi_example | 0.1 |
| cftime | 1.6.2 |
| charset-normalizer | 3.3.2 |
| click | 8.1.7 |
| cligj | 0.7.2 |
| cloudpickle | 2.2.1 |
| cmyt | 1.3.1 |
| cmyt-tests | 1.3.1 |
| colorspacious | 1.1.2 |
| contourpy | 1.2.0 |
| coolprop | 6.6.0 |
| coolprop-tests | 6.6.0 |
| coverage | 7.3.0 |
| cpp-exceptions-test | 0.1 |
| cramjam | 2.6.2 |
| cryptography | 39.0.2 |
| cssselect | 1.2.0 |
| cycler | 0.11.0 |
| cytoolz | 0.12.2 |
| cytoolz-tests | 0.12.2 |
| decorator | 5.1.1 |
| demes | 0.2.3 |
| deprecation | 2.1.0 |
| distlib | 0.3.7 |
| distutils | 1.0.0 |
| docutils | 0.20.1 |
| exceptiongroup | 1.1.3 |
| executing | 2.0.1 |
| faicons | 0.2.2 |
| fastparquet | 2023.7.0 |
| fiona | 1.8.22 |
| fonttools | 4.42.1 |
| fpcast-test | 0.1.1 |
| freesasa | 2.2.0.post3 |
| frozenlist | 1.4.0 |
| fsspec | 2023.6.0 |
| fsspec-tests | 2023.6.0 |
| future | 0.18.3 |
| future-tests | 0.18.3 |
| galpy | 1.9.0 |
| gdal | 3.5.1 |
| gensim | 4.3.1 |
| gensim-tests | 4.3.1 |
| geopandas | 0.13.2 |
| geopandas-tests | 0.13.2 |
| geos | 3.10.3 |
| gmpy2 | 2.1.5 |
| gsw | 3.6.16 |
| gsw-tests | 3.6.16 |
| h5py | 3.7.0 |
| h5py-tests | 3.7.0 |
| hashlib | 1.0.0 |
| html5lib | 1.1 |
| htmltools | 0.5.1 |
| idna | 3.6 |
| igraph | 0.10.6 |
| imageio | 2.31.1 |
| iniconfig | 2.0.0 |
| ipyleaflet | 0.18.2 |
| ipython | 8.18.1 |
| ipywidgets | 8.0.6 |
| jedi | 0.19.0 |
| jedi-tests | 0.19.0 |
| Jinja2 | 3.1.2 |
| joblib | 1.3.2 |
| joblib-tests | 1.3.2 |
| jsonschema | 4.17.3 |
| jsonschema-tests | 4.17.3 |
| jupyter-core | 5.5.0 |
| jupyterlab-widgets | 3.0.9 |
| kiwisolver | 1.4.4 |
| lazy_loader | 0.3 |
| lazy_loader-tests | 0.3 |
| lazy-object-proxy | 1.9.0 |
| libhdf5 | 1.12.1 |
| libheif | 1.12.0 |
| libmagic | 5.42 |
| libnetcdf | 4.9.2 |
| lightgbm | 4.3.0 |
| linkify-it-py | 2.0.2 |
| logbook | 1.6.0 |
| lxml | 4.9.3 |
| lzma | 1.0.0 |
| markdown-it-py | 3.0.0 |
| MarkupSafe | 2.1.3 |
| matplotlib | 3.5.2 |
| matplotlib-inline | 0.1.6 |
| matplotlib-pyodide | 0.2.0 |
| matplotlib-tests | 3.5.2 |
| mdit-py-plugins | 0.4.0 |
| mdurl | 0.1.2 |
| micropip | 0.5.0 |
| mizani | 0.11.1 |
| mne | 1.5.0 |
| mne-tests | 1.5.0 |
| more-itertools | 10.1.0 |
| mpmath | 1.3.0 |
| mpmath-tests | 1.3.0 |
| msgpack | 1.0.5 |
| msgspec | 0.18.4 |
| msprime | 1.2.0 |
| multidict | 6.0.4 |
| munch | 4.0.0 |
| mypy | 1.5.1 |
| mypy-extensions | 1.0.0 |
| mypy-tests | 1.5.1 |
| netcdf4 | 1.6.4 |
| networkx | 3.1 |
| networkx-tests | 3.1 |
| newick | 1.9.0 |
| nh3 | 0.2.15 |
| nlopt | 2.7.0 |
| nltk | 3.8.1 |
| nltk-tests | 3.8.1 |
| nose | 1.3.7 |
| numcodecs | 0.11.0 |
| numcodecs-tests | 0.11.0 |
| numpy | 1.26.4 |
| numpy-tests | 1.26.4 |
| openblas | 0.3.23 |
| opencv-python | 4.8.0.76 |
| openssl | 1.1.1n |
| optlang | 1.7.0 |
| optlang-tests | 1.7.0 |
| orjson | 3.9.2 |
| packaging | 23.1 |
| palmerpenguins | 0.1.4 |
| pandas | 1.5.3 |
| pandas-tests | 1.5.3 |
| parso | 0.8.3 |
| pathspec | 0.11.2 |
| patsy | 0.5.3 |
| patsy-tests | 0.5.3 |
| peewee | 3.16.3 |
| peewee-tests | 3.16.3 |
| Pillow | 10.0.0 |
| pillow_heif | 0.8.0 |
| pkgconfig | 1.5.5 |
| platformdirs | 4.0.0 |
| plotly | 5.20.0 |
| plotnine | 0.0.post20+g64295e1 |
| pluggy | 1.2.0 |
| prompt-toolkit | 3.0.41 |
| protobuf | 4.23.1 |
| pure-eval | 0.2.2 |
| py | 1.11.0 |
| pyclipper | 1.3.0.post4 |
| pycparser | 2.21 |
| pycryptodome | 3.18.0 |
| pycryptodome-tests | 3.18.0 |
| pydantic | 1.10.7 |
| pydecimal | 1.0.0 |
| pydoc_data | 1.0.0 |
| pyerfa | 2.0.0.3 |
| pyerfa-tests | 2.0.0.3 |
| Pygments | 2.16.1 |
| pyheif | 0.7.1 |
| pyinstrument | 4.4.0 |
| pynacl | 1.5.0 |
| pyodide-http | 0.2.1 |
| pyparsing | 3.1.1 |
| pyproj | 3.4.1 |
| pyrsistent | 0.19.3 |
| pysam | 0.22.0 |
| pyshp | 2.3.1 |
| pytest | 7.2.2 |
| pytest-benchmark | 4.0.0 |
| python-dateutil | 2.8.2 |
| python-magic | 0.4.27 |
| python-multipart | 0.0.6 |
| python-sat | 0.1.7.dev26 |
| python_solvespace | 3.0.8 |
| pytz | 2023.3 |
| pywavelets | 1.4.1 |
| pywavelets-tests | 1.4.1 |
| pyxel | 1.9.10 |
| pyyaml | 6.0.1 |
| rebound | 3.24.2 |
| reboundx | 3.10.1 |
| regex | 2023.8.8 |
| regex-tests | 2023.8.8 |
| requests | 2.31.0 |
| retrying | 1.3.4 |
| river | 0.19.0 |
| river-tests | 0.19.0 |
| RobotRaconteur | 0.15.1 |
| ruamel.yaml | 0.17.32 |
| rust-panic-test | 1.0 |
| scikit-image | 0.21.0 |
| scikit-image-tests | 0.21.0 |
| scikit-learn | 1.3.1 |
| scikit-learn-tests | 1.3.1 |
| scipy | 1.11.2 |
| scipy-tests | 1.11.2 |
| screed | 1.1.2 |
| screed-tests | 1.1.2 |
| seaborn | 0.13.2 |
| setuptools | 68.1.2 |
| shapely | 1.8.2 |
| shapely-tests | 1.8.2 |
| sharedlib-test | 1.0 |
| sharedlib-test-py | 1.0 |
| shiny | 0.9.0 |
| shinyswatch | 0.6.0 |
| shinywidgets | 0.3.2 |
| simplejson | 3.19.1 |
| simplejson-tests | 3.19.1 |
| sisl | 0.14.2 |
| sisl-tests | 0.14.2 |
| siuba | 0.4.4 |
| six | 1.16.0 |
| smart_open | 6.3.0 |
| sniffio | 1.3.0 |
| soupsieve | 2.4.1 |
| sourmash | 4.8.4 |
| sparseqr | 1.2 |
| sqlalchemy | 2.0.20 |
| sqlalchemy-tests | 2.0.20 |
| sqlite3 | 1.0.0 |
| ssl | 1.0.0 |
| stack-data | 0.6.3 |
| starlette | 0.32.0.post1 |
| statsmodels | 0.14.0 |
| statsmodels-tests | 0.14.0 |
| suitesparse | 5.11.0 |
| svgwrite | 1.4.3 |
| swiglpk | 5.0.8 |
| sympy | 1.12 |
| sympy-tests | 1.12 |
| tblib | 3.0.0 |
| tenacity | 8.2.3 |
| termcolor | 2.3.0 |
| test | 1.0.0 |
| texttable | 1.6.7 |
| threadpoolctl | 3.2.0 |
| tomli | 2.0.1 |
| tomli-w | 1.0.0 |
| toolz | 0.12.0 |
| toolz-tests | 0.12.0 |
| tqdm | 4.66.1 |
| traitlets | 5.14.0 |
| traits | 6.4.2 |
| traits-tests | 6.4.2 |
| traittypes | 0.2.1 |
| tskit | 0.5.5 |
| typing-extensions | 4.7.1 |
| tzdata | 2023.3 |
| uc-micro-py | 1.0.2 |
| uncertainties | 3.1.7 |
| uncertainties-tests | 3.1.7 |
| unyt | 2.9.5 |
| unyt-tests | 2.9.5 |
| urllib3 | 2.1.0 |
| wcwidth | 0.2.12 |
| webencodings | 0.5.1 |
| wordcloud | 1.9.2 |
| wrapt | 1.15.0 |
| xarray | 2023.12.0 |
| xarray-tests | 2023.12.0 |
| xgboost | 1.6.1 |
| xlrd | 2.0.1 |
| xyzservices | 2023.10.1 |
| xyzservices-tests | 2023.7.0 |
| yarl | 1.9.2 |
| yt | 4.1.4 |
| zarr | 2.13.3 |
| zarr-tests | 2.13.3 |
| zengl | 2.2.0 |
Shinylive: Shiny + WebAssembly
Shinylive allows you to run Shiny applications entirely in a web browser, without the need for a separate server running Python.
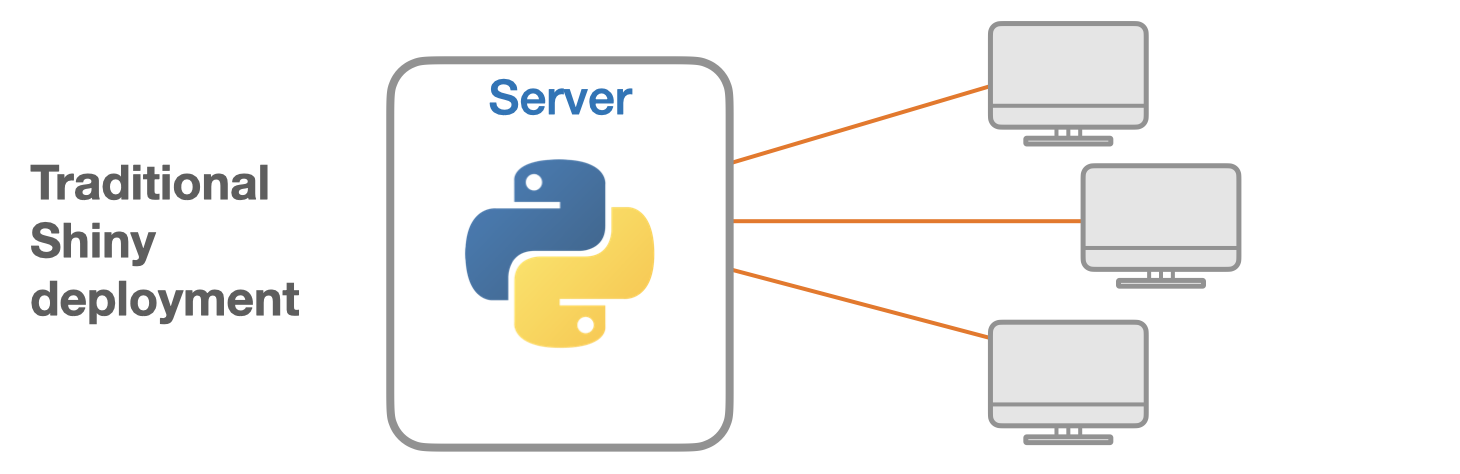
The traditional way of deploying Shiny involves in a separate server and client: the server runs Python and Shiny, and clients connect via the web browser. Each client keeps an open websocket connection as long as they are using the application.
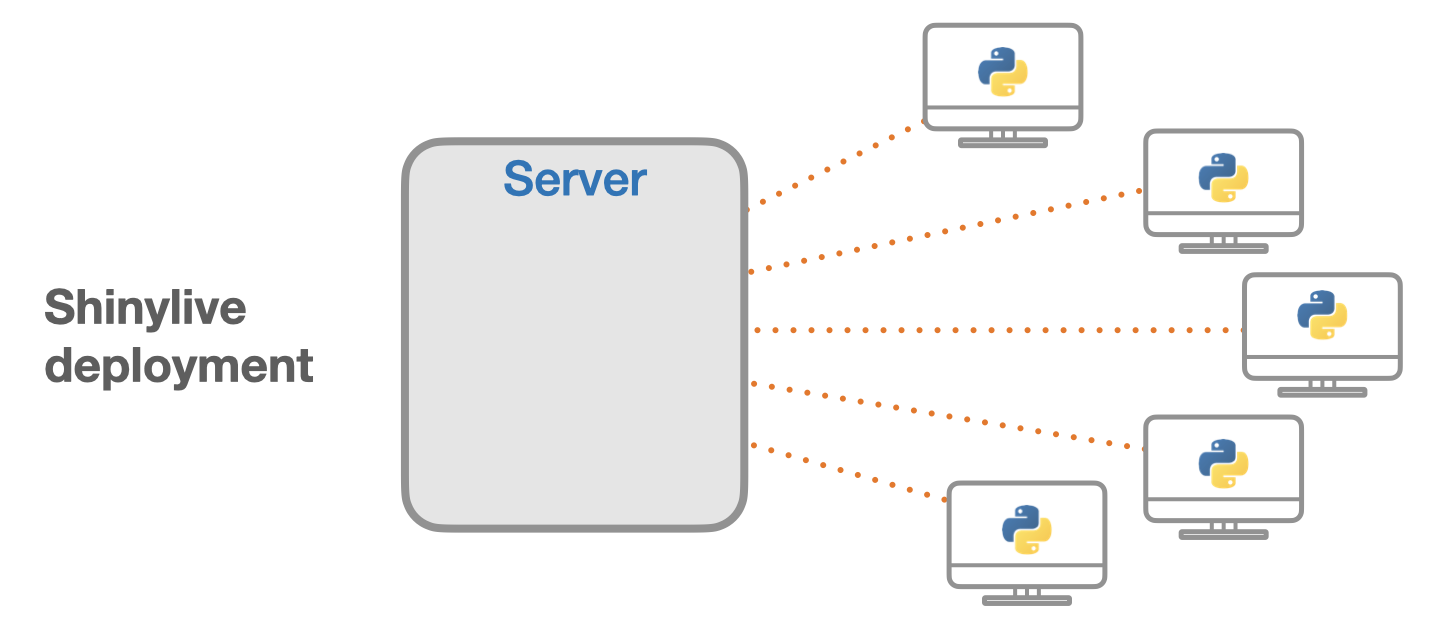
When an application is deployed with Shinylive, Python and Shiny run in the web browser: the browser is effectively both the client and server for the application. There is a web server that serves files, but it does not run Python or Shiny—it can be a “dumb” static web server.
If you’ve looked at any of the documentation on this web site, or have played with any of the examples at shinylive.io, you have already used Shinylive. The examples on this site (with a handful of exceptions) and the shinylive.io examples all run using Shinylive, meaning that they run in your web browser.
This is all possible because of the magic of WebAssembly and Pyodide.
- WebAssembly (wasm) is a binary format for compiled programs that can run in a web browser at near-native speeds.
- Pyodide is a port of Python and many packages, compiled to WebAssembly.
Applications deployed with Shinylive have some advantages and disadvantages compared to a traditional Shiny deployment. The advantages include:
- No installation: No need to install Python or Shiny on a computer.
- Easy sharing: Share applications with just a URL.
- Easy deployment: Applications can be deployed to any static web hosting service.
- Easy scaling: Since applications can be served as static files on a “dumb” web server it is easy to scale to high traffic loads.
- Security: Because the code is not running on a server, it eliminates a class of potential security risks. The code runs in the client web browser’s code sandbox, which a platform that has been battle tested over the years.
Some of the disadvantages of using Shinylive deployments compared to traditional Shiny deployments:
- Fewer packages: Not all Python packages are available in Pyodide.
- Large download size: The downloaded payload size may be significantly larger. Downloading Pyodide and Python packages to run a Shiny application requires about 13MB of data. Other packages can significantly increase the amount of data. For example, numpy is 7.5 MB, pandas is 13 MB, and matplotlib is 11.5 MB. However, all of this data will be cached by the browser so that it will load quickly in subsequent runs.
- No secrets: Code and data for the application must be sent to the browser, so it can’t be kept secret from the user.
- Restricted network: For security reasons, the web browser itself imposes restrictions on network communication.
For certain types of Shiny applications, some of the limitations can be worked around by pre-processing a data set and including it with the application.
One important difference between traditional Shiny and Shinylive deployments is that compute power is shifted from the server to the client. In many cases, the client browser will have more compute power than a server, especially since the compute power of the user’s machine is not shared across multiple users. However, in other cases, this can be a roadblock, such as when a powerful server is needed to perform very intensive computations or requires access to a private data store.
Sharing and deploying Shinylive applications
In this document, we’ll use the terms sharing and deploying Shiny applications. When we talk about sharing, we’re referring to a method of encoding the application in a URL so that others can run the application if they simply have the URL. Sharing an application via a URL does not require you to have a server—you can simply use the server at shinylive.io.
When we talk about deploying applications, we mean creating a set of files which are to be served up by a web server. This does require you to have a web server. For a traditional Shiny deployment, this means having a server that runs R or Python. For a Shinylive deployment, this only requires a server that can serve static files—it can be a “dumb” web server which does not run Python. For example you could deploy your application to GitHub Pages or Netlify.
Sharing Shinylive applications
The easiest way to share an application is to create it on the Shinylive editor, and then click on the “Create share link” button. This will encode the application in a URL, which you can then share with others.

The dialog box that appears will provide two links: one for the application in the Shinylive editor, and one with for the application running standalone.
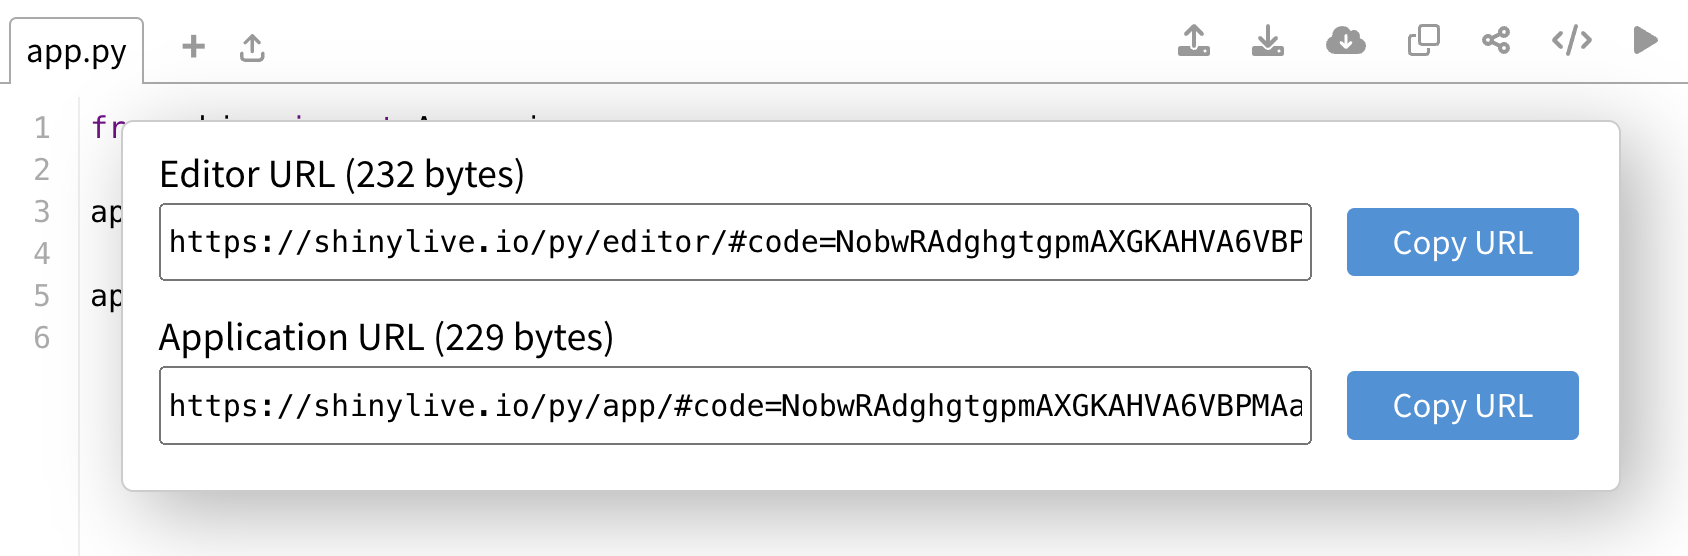
Here is an example of a Shiny application that is encoded in a share URL. This will lead to the application with an editor and Python console:
https://shinylive.io/py/editor/#code=NobwRAdghgtgpmAXGKAHVA6VBPMAa…
If you want to share just the Shiny application, without the editor and console, use the other link, which contains /app/ instead of /editor/:
https://shinylive.io/py/app/#code=NobwRAdghgtgpmAXGKAHVA6VBPMAa…
These URLs have a hash that includes #code=.... The code for the entire application is encoded in that hash. Notably, web browsers do not send the hash to the web server, so the server actually never sees the content of the Shiny application.
The sharing dialog shows how long the URL is, in bytes. If you want to share a link on Twitter, the maximum length of a URL is about 4000 bytes, and it will be shortened using their t.co service. If you use bit.ly, the maximum length is about 2000 bytes. These link shorteners redirect the user to the longer URL.
Deploying Shinylive applications
With Quarto websites
Note
The section below describes how to embed Shinylive applications in a Quarto document – they can be thought of as Shiny applets in that mode. As of November 2023, the pre-release version of Quarto can work in a different mode: it can generate dashboards where the entire page is a single Shiny application. See this repository for an example and more information about how they work and how to deploy them. This page will be updated soon with more information about this mode.
The easiest way to deploy Shinylive applications is using the quarto-shinylive extension. This extension allows you to embed Shiny apps into a quarto html document, and deploy those applications anywhere that can host quarto websites. Once you have the extension installed, you can insert shinylive-python code blocks into the document.
```{shinylive-python}
#| standalone: true

from shiny import *

app_ui = ui.page_fluid(
    ui.input_slider("n", "N", 0, 100, 40),
    ui.output_text_verbatim("txt"),
)

def server(input, output, session):
    @output
    @render.text
    def txt():
        return f"The value of n*2 is {input.n() * 2}"

app = App(app_ui, server)
```
Without Quarto
If you’re not using Quarto, you’ll need to export and deploy your application yourself. This involves:
- Exporting the application: Create a directory of files that includes the Shinylive distribution and the application code.
- Deploying: Upload that directory to a static web host.
There are many ways to deploy to a static web server. For example, you could deploy to Netlify or GitHub Pages, or use Posit Connect, as described later in this page.
First, install the shinylive package:
pip install shinyliveNext, create a directory with a Shiny application. We’ll use the shiny create command to create a basic application in a directory called myapp/.
shiny create myappNext, create the distribution with shinylive:
shinylive export myapp siteThe resulting site directory will contain the following files (among others that are not shown for brevity):
site
├── app.json          # The application's files serialized to JSON
├── index.html        # A web page for the application
├── edit
│   └── index.html    # A web page for an editor view of the application
├── shinylive-sw.js   # Shinylive service worker
└── shinylive         # Shinylive content
    └── pyodide       # Pyodide files
This directory can now be deployed to a static web hosting service.
You can preview the application by serving the files in the site directory:
python3 -m http.server --directory site 8008This will serve the files in the site directory on port 8008. Then point your browser at http://localhost:8008/. You can also see the application with an online editor by pointing your browser at http://localhost:8008/edit/. (Note that any changes to the files there are ephemeral—they won’t be saved to disk.)
Note
To run a Shinylive application, the files must be served with a web server; simply pointing your browser to the files on disk will not work. This is because security restrictions in web browsers require some assets to be retrieved from a web server instead of from disk.
If you have multiple applications, you may want to export them in subdirectories of the site, so that they can all share the same Shinylive assets. You can do this with the --subdir option:
shinylive export myapp1 site --subdir app1
shinylive export myapp2 site --subdir app2
The site/shinylive/pyodide/ directory will contain a Pyodide distribution containing just the Python packages needed to run the exported application(s). There are some cases where you may want to include other packages. For example, if you want users who visit the edit/ URL to be able to load more packages. In order to include extra packages, you have two options:
- Add a
requirements.txtfile to an application which lists the extra packages. - Run
shinylive export myapp site --full-shinylive. This will cause it to include all of the Python packages from the Shinylive distribution.
Note
The Shinylive distribution is under rapid development, and the files in the distribution will change. The shinylive export command automatically downloads and caches a a copy of the Shinylive distribution on your computer. To make sure you are up to date, run:
pip install shinylive --upgrade
shinylive assets remove   # Remove old cached shinylive files
Then the next time you run shinylive export, it will download the latest version.
Deploying to Posit Connect
After creating the directory with the application and Shinylive bundle, you can deploy it to many different of static web hosting services. Posit Connect is one of those options, and allows you to control over who can access the application.
If you would like to deploy to a Posit Connect server, install and configure the rsconnect-python package as described in the Deploy page. Then you can deploy the application as a static website:
rsconnect deploy html sitePython packages
The Shinylive distribution is built on Pyodide, and contains a number of additional packages on top of the standard Pyodide distribution.
It is also possible to use other Python packages, provided that they are packaged as wheels, and contain no compiled code. Additionally, they must not use features that aren’t available in Pyodide. For example, if a package has code that uses urllib.request, it won’t work in Pyodide.
Installed packages
The Shinylive distribution includes packages from Pyodide 0.25.1, as well as some additional Shiny-related packages. See this page for a list of packages included in Pyodide.
Shinylive includes the following packages. Most are part of the Pyodide distribution, and a few of them are added by Shinylive.
Testing whether a package is available
The Shinylive distribution includes many packages, but you may want to use one that is not included.
It is possible to install packages using Pyodide’s micropip package. To do that, simply visit the Shinylive examples page and run the following in the Python console:
import micropip
await micropip.install("mypackage")
import mypackage
If that works without errors, then your package is usable in a Shinylive application. (There are some exceptions, where a package will load but not be fully usable in Pyodide.)
The micropip.install command will install the package from PyPI by default. However, you can provide a URL that points directly to your package, like https://example.com/mypackage-1.0-py3-none-any.whl.
Requiring extra packages with requirements.txt
To use extra packages as part of your application, you can add a requirements.txt file to your application, as demonstrated in the extra packages example. The format of the requirements.txt file is similar to a “normal” requirements.txt file. For example, it could look like this:
isodate
attrs==21.4.0
Each time someone runs your Shiny application, their web browser will fetch those packages from PyPI. It will then install the packages to a virtual file system (VFS); when the user closes the page or navigates away from it, the VFS is discarded. If the user goes back and runs the application again, those files can be fetched from the browser cache instead of from PyPI.